Sonntag, 30. März 2014

Vorbereitungen für App-Debugging auf einem Android Gerät

Möchte man seine App auf ein Smartphone über eine IDE installieren, so müssen vorher ein paar Einstellungen am Smartphone durchgeführt werden:

"Unbekannte Quellen" aktivieren:
  • Damit wird die Installation von Apps erlaubt, die nicht über den Playstore installiert werden
  • Einstellungen -> Optionen -> Sicherheit -> aktiviere "Unkebannte Quellen"
"USB-Debugging" aktivieren:
  • Einstellungen -> Optionen -> Entwickleroptionen -> aktiviere "USB-Debugging"
  • Falls ihr keine Entwickleroptionen angezeigt bekommt, so könnt ihr diese wie folgt aktivieren:
    • Entwicklermodus aktivieren: Einstellungen -> Optionen -> Geräteinformationen -> Klicke 7mal auf "Buildnummer"
Wenn ihr unter Windows arbeitet, dann werdet ihr wahrscheinlich Treiber für Euer Smartphone brauchen.
Auf der OEM USB Drivers Seite findet ihr eine Anleitung für die Installation und
eine Liste mit den gängigsten Smartphoneanbietern.

Da ich selbst ein Samsung S4 habe, kann ich Samsung Android USB Treiber für Windows ohne Kies empfehlen.

Es kann sein, dass ihr den ADB Server neu starten müsst, bevor die IDE eurer Gerät erkennt.
Außerdem solltet ihr noch das USB-Debugging auf eurem Gerät zulassen:

Mittwoch, 19. März 2014

Java 7 Unterstützung für Android Studio

Mit buildToolsVersion 19 ist nun auch Android Studio kompatibel mit Java 7.

Hierzu muss das Objekt 'compileOptions' in die build.gradle Datei hinzugefügt werden (mehr Infos: Gradle Plugin User Guide):

    compileOptions {
            sourceCompatibility JavaVersion.VERSION_1_7
            targetCompatibility JavaVersion.VERSION_1_7
    }

   
Nach einem 'Sync Project With Gradle Files' bekommt man folgende Meldung:
Nachdem das Projekt neu geladen wurde kann es direkt losgehen mit
  • diamond operator
  • strings in switch statements
  • automatic resource management
  • numerische Literale mit '_'
  • multi-catch
  • ...


Quelle:

Dienstag, 7. Januar 2014

Screenrecording with KitKat

Here is a short introduction how to use the new feature:

  • connect your device
  • open command line 
  • go to adb directory (in AS: android-studio/sdk/platform-tools)
  • with the following command you cann see all available options:
    • adb shell screenrecord --help

  • recording a video:
    • adb shell screenrecord /sdcard/test.mp4
  • recording video with special size:
    • adb shell screenrecord /sdcard/test1.mp4 --size 1920x1080


Samstag, 28. Dezember 2013

How to show my g+ posts on my website?

The first time I started with this issue i didn't even know where to start. So i asked a question on SO - the answer helped me to get the right direction.
Now i solved this issue and want to share the solution in this post:

Short introduction
If you want to show your g+ posts on your website you have to use the Google+ HTTP API (programming interface to g+).
You can retrieve all public posts with the API call activities.list.

The HTTP Request to get the public posts looks like this:

As you can see you have to put just one thing inside the url:
  • the userId of your g+ account (you can find this id in the url of your g+ "profile" site)
On this site you can try it: https://developers.google.com/+/api/latest/activities/list

Just enter your userId and set the collection to "public". After clicking on "execute" you can see the request to the server and the response from the server.

To get a successful response from the server you have to Authorizing your API request.
Every request that an application sends to google needs an "API Key".

How to get an API Key for the G+ API?
First you have to create a new project in the Googles API Console:


Then you have to enable the "Google+ API" Service:
click "on"
enable Google+ API Service


accept terms of use 
accept terms of use
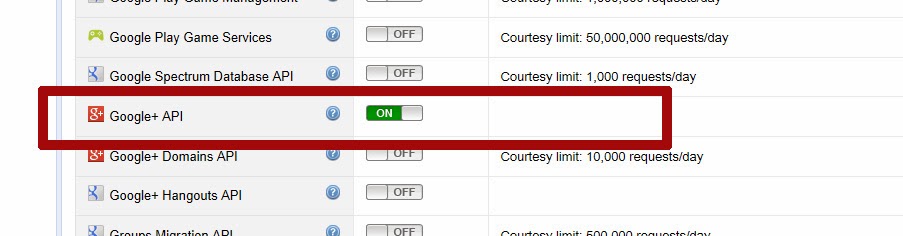
your Google+ API Service is enabled


After the previous steps you can find you API Key at the menu item "API Access":
your API Key

Example: 
Show Author, published date of post and the posts content on a php website:
  • After unzipping the *.gz and than the *.tar file you should see the php client library "google-api-php-client"
  • create a simple "index.php" (at the same folder where you find the php client library) where you want to show your posts, it can look like this:

  • create a "show_posts.php" and copy the following code inside the file:

  • Now it's done! Open your "index.php" in a webbrowser and you see all your posts!

Freitag, 20. Dezember 2013

Action Bar UI TAB NAVIGATON


Since Android 3.0 there was added a window feature to the API called "action bar"  (Design Patterns).
The action bar provides two navigation modes: tabs and drop-down-list.

Before you start to develop an app you make some basic decisions about the UI Design.
If you decide to use the action bar with "NAVIGATION_MODE_TABS" you have to make you familiar with the android system and how it handles this navigation mode:
Sometimes action bar tabs are showing as drop-down-list, this behaviour can be helpful to save space.
But it's also annoying if you expect tabs and the system shows a drop-down-list (this issue is tracked here; good explanation on SO by CommonsWare).

Now, how to solve this issue?
  • first you have to think about your UI layout and if you really want to show always tabs you have to take a "ViewPager" with "PagerTabStrip".
  • if you already developed an app there are some workarounds (described in this post ): one of this is very simple: just set the navigation mode of the action bar after you're adding the tabs.

Freitag, 15. November 2013

Gradle Android Plugin Errors&Solutions

  • Google Repository is missing
    • A problem occurred configuring project ':myApp'.
      > Failed to notify project evaluation listener.
         > Could not resolve all dependencies for configuration ':myApp:_Flavor1DebugCompile'.
            > Could not find com.google.android.gms:play-services:4.0.30.
              Required by:
                  myAppProject:myApp:unspecified
    • check in SDK Manager if "Google Repository" is installed (so link)

Mittwoch, 25. September 2013

IDE doesn't show "build-variants" caused by: "Gradle 'linkedGradleProject' project refresh failed: A path must be specified!"

After installation of AS 0.2.10 the studio didn't show any "build variants" and I got the following message:
"Gradle 'linkedGradleProject' project refresh failed: A path must be specified!"
In my gradle settings (File -> Settings -> Gradle) I wanted to use "default gradle wrapper (recommended)".
But this option was disabled and a comment was "(not configured for the current project)".
Also I recognized that the linked gradle project was the wrong one (the root folder of my android studio projects -> in earlier times there was a bug in AS where changes in the gradle.build file caused a reorganization of the prject: the IDE generated an "*.iml" file to the parent folder of the project).


The solution was simple:
  •  close the project
  • import project
  • choose the "settings.gradle" file of you project
  • a dialog occurs: "Import Project from gradle"
  • now you have the option to "Use default wrapper (recommended)"
  • if you still get the message of the "linkedGradleProject" just restart the IDE than it shouldn't appear again.
    But the important thing is that the IDE shows your "build-variants"!